While sometimes it feels overwhelming to start any large project, beginning your N scale model railroad is like embarking on a thrilling journey where creativity meets craftsmanship. As I began in this model world, I acquired a bunch of old N scale equipment from my Dad and wanted to get started on a practice layout. In any endeavor, success hinges on effective planning. As I progressed, my initial focus centered on honing the layout plan. Only once this foundation was solidified could I proceed to construct the base, mold the existing track to align seamlessly, and envision the integration of pre-existing structures I held at hand.
Planning Your Track Layout: The Dance of Rails
Tracks are the veins of your layout, guiding the pulse of your miniature world. Begin with a rough plan on paper, letting themes and operational possibilities guide your strokes. As I covered in previous posts, software like AnyRail or SCARM can make it really easy to quickly design and understand what will fit in your space. This gives you a virtual place to continue refining your layout until you are happy. But remember, the true test lies in the real world. Lay down tape to physically test your layout in the space before committing to any final design.
Building a Sturdy Base: A Solid Start
Before dreams can run wild, you need a strong base to build upon. Your choice of material, whether it’s lightweight foam board or durable plywood, sets the stage. Frame it up – a wooden frame underneath lends stability, while also providing space for wiring and scenic details. Bolster joins with glue and screws for added resilience against the test of time.
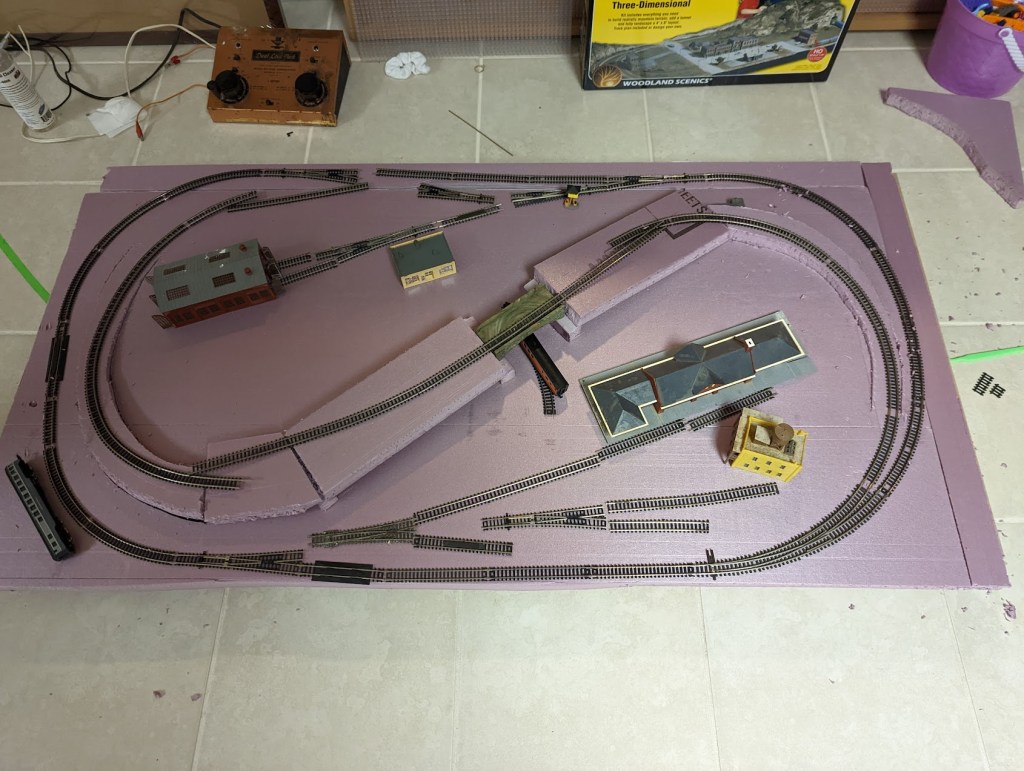
For this project I was originally thinking it would be about 2’x3′ due to the amount of material I possessed, but once the track was put down on the floor I realized 2’x4′ might work as well. I went to Home Depot to find the cheapest materials since this was more of a temporary layout than long term, and settled on particle board with a 1×2″ frame. This doesn’t give a lot of room underneath for wiring but it was fine for this purpose. With the board ready, I began placing track down to determine if my plans would fit in the area and see what it looked like.

Bringing Scenery to Life: Reimagining the Past
The allure of incorporating existing scenery from another layout is undeniable, especially when it’s already built. Scrutinize the condition and theme compatibility of these scenic elements. If they fit, it’s a golden opportunity to blend nostalgia with your newfound creativity. As I began to unpack old buildings, I was brought back in time to when my Dad had this setup in his basement. I didn’t model this after any specific prototype railroad, so I mainly picked existing buildings that would fit inside the loops and give some industry for the sidings. When using old pieces, you’ll likely want to clean them up with a fresh coat of paint or a touch of weathering – to seamlessly weave these pieces into your envisioned landscape.
The astute viewer may have noticed below the track is now sitting on foam vs the particle board. At the time I was continuing to research modern techniques and practices, and quickly realized foam was widely used across different scales and layout sizes. Knowing this would give many more chances to practice newer scenery ideas, I headed back to Home Depot and picked up a sheet of 1″ foam board.
As we often find in practice, it was around this time I realized a few extra inches in both directions would make a huge difference. The outside curves and inner reverse loop were a lot easier to fit with an extra ~2″ depth, though since the track is so close to the edge even more may have been preferable. My vision was to make a hill/mountain in the back-right section, and when I started cutting foam to shape the tunnel an extra 2″ in that direction also helped ease the fit.

Harnessing the Power of Tracks: Efficiency Meets Reality
Tracks, like arteries, carry life through your layout. Approach them with intent. Design with a purpose – blend curves, sidings, and switches into a harmonious flow. Avoid overstuffing – give scenery and structures the room to breathe. Consider the thrill of operations – the mainline, sidings, and industry spurs invite shunting and switching, transforming your static display into a living, breathing world. I didn’t want to pack this world with too much, but also you want the layout to be fun for what your intent is.
As you can see, the other advantage foam gives is the ease of cutting and shaping elevated options. My reverse loop in the center departs from the front track, travels uphill to cross the middle of the layout over a bridge, and then back downhill to meet with the rear track. Reverse loops give the ability to turn engines around on the layout, but do add complications with wiring that I’ll need to deal with in the future. With the flexibility of foam, I was able to use a sharp blade to cut out the start of the hill climbs, which gives the track a smooth flow through the climb. It’s only held in place temporarily here, but later I’ll use some spray foam and glue underneath to secure the hill pieces.
Setting the Wheels in Motion
Your N scale model railroad like mine begins with these foundational steps, where creativity finds its wings through craftsmanship. As you build your base and choreograph the track layout, you set the stage for a miniature masterpiece that captures both your imagination and that of anyone fortunate enough to witness it. At this point I’m fairly satisfied with the layout given the amount of track I was able to reuse and fit, and being able to visualize the design before anything is permanent is key to ensuring future success. Remember, this is only the prologue – every step propels you closer to a railroad reality that’s uniquely yours.
