Model railroading is a fascinating hobby that has been around for many years. For me, like many, it all started when I was a child, and my dad introduced me to the world of model trains. He was an avid model railroader and had a passion for creating realistic scenes and landscapes. I remember spending countless hours with him in his basement, watching him work on his layout and helping him with various tasks. As I grew older, I became more interested in the hobby and started building my own models.
One of the things that always impressed me about my Dad’s layouts was their size and complexity. When I was very young I remember he had a layout that travelled around the entire basement, complete with intricate landscapes and buildings. This was before DCC was around so it was using block-switching where he had multiple control panels around the room. Essentially, it involves dividing a layout into different blocks or sections, each of which can be controlled independently. This allows multiple trains to run on the same layout without colliding with each other.
When using block switching, each block is typically controlled by a separate electrical switch or circuit breaker. As a train enters a new block, you flip the switch for the previous block to which cuts the power and make sure the switch for the next block is set so that it sends power to the new block. This allows the train to move smoothly from one section of the layout to another.
Block switching can be used to simulate a variety of real-world operations, such as mainline runs, switching yards, and industrial spurs. It allows model railroaders to run multiple trains at the same time, switch cars between different tracks, and simulate the movement of trains through different regions or areas. You can also use 3 way switches to switch power between multiple speed controllers for independently controlling the speed of multiple trains.
Compromises
As the family grew older he was forced to downsize and shrunk his layout to only one of the rooms in the basement, and also switched to N scale which is a smaller scale. I haven’t found any pictures of his layout yet but I’m sure they’re kicking around in some old boxes. Based on the room size I’m guessing this layout was around 10 feet long and 2-3 feet wide.
N scale is smaller than HO scale, with a ratio of 1:160 versus 1:87 for HO scale. This means that N scale trains and scenery are smaller and more compact than HO scale, which can make it more difficult to work with certain aspects of the layout. For example, creating realistic scenery and terrain can be challenging on a smaller scale, as there is less room for detail and texture. However, N scale can be ideal for modelers who have limited space or want to create a more intricate and detailed layout. N scale trains are also lighter and require less power to operate than HO scale, which can make them easier to handle and operate. I suspect the smaller room size was his main reason for downsizing to N scale.
Around the mid 90s he must have been yearning for more space because it was around that time we started finishing a room under the porch that was previously just used to store bikes and junk. It originally had a dirt floor so I remember him laying down a concrete floor and adding a drop ceiling. This room ended up being his final modeling space, it was a good size around 20 feet long and 7-8 feet wide. With this bigger space, he switched back to HO scale, which allowed him to create even bigger scenes. I learned a lot from my dad during those years, and his love for the hobby inspired me to continue building models to this day.
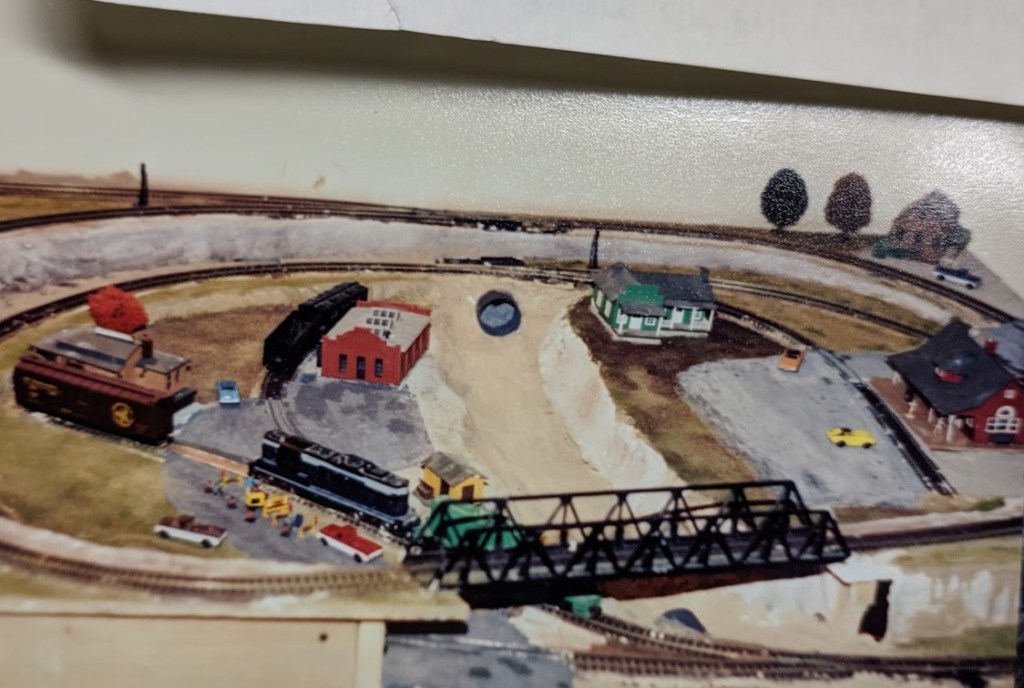
Despite his layout being large and more complex, he made sure to set aside some space for me to work on my own projects. He gave me about four feet of space next to his layout, and we worked together to create a simple double circular track that would be perfect for my first HO scale layout.

Even though my layout was small, my dad made sure to treat it with the same level of care and attention to detail as his own. We spent countless hours working on the landscaping and scenery, creating a realistic environment for my trains to run through. It was a great way for me to learn about the different techniques and materials used in model railroading, and I loved being able to see my own creation come to life.
One of the best things about my layout was that it had a rail connection back to my dad’s larger railroad. This meant that I could run my trains on my own layout or switch them over to his and run them through his more complex scenes. It was a great way to learn about switching and operations, and it gave me a sense of satisfaction to be able to contribute to his layout as well.
Overall, building my own HO layout next to my dad’s was an incredible experience. It allowed me to learn new skills, express my creativity, and work alongside my dad on a project that we both loved. It was a great way to bond with him and share our love for the hobby, and I will always cherish those memories.
Legacy
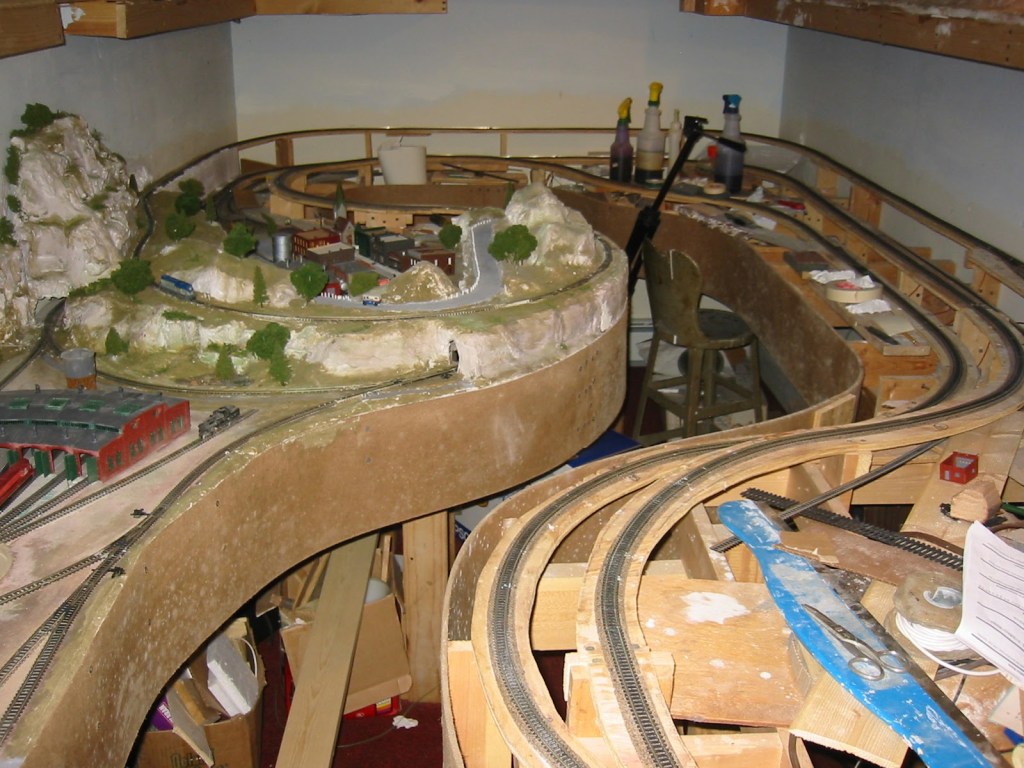
My dad passed away a few years ago, and it was a difficult time for me and my family. But he left behind a legacy that I will always cherish – his passion for model railroading. He had been working on a layout for years, and it was a project that he poured his heart and soul into. When he passed away, the layout sat unused for a few years. My mom wants to disassemble it so I’ve started to reuse some of the materials he had collected over the years.
As I started to work on my own model railroad, I knew that I wanted to incorporate some of my dad’s models into my new layout. It was a way for me to honor his memory and continue his legacy. It was also an advantage being able to rescue a good amount of existing track and switches which made the startup cost much lower.
One of the most important things I have learned in my time building model railroads is the importance of planning. It is essential to start with a prototype concept and a plan before building anything. This ensures that you have a clear idea of what you want to accomplish and that you have all the materials you need before you start. It also makes the building process much smoother and more efficient, as you won’t have to go back and make changes later.
For my new layout, I spent a lot of time researching different prototype concepts and studying different types of scenery and landscapes. I wanted to create a layout that was both realistic and unique, and I knew that planning was crucial to achieving that goal. I knew that I wanted to model a local version of the Lehigh Valley Line that ran through Flemington and continued on to Jersey City. I created a detailed plan that included everything from the layout design to the materials I would need, and I made sure to stick to it as much as possible. Of course, there were some changes along the way, but having a plan helped me stay on track and make progress faster.
Overall, model railroading is a hobby that is both challenging and rewarding. It requires a lot of patience, attention to detail, and creativity, but the end result is always worth it. It is also a very relaxing hobby as you can build at your own pace and have complete creative freedom over your layout. At the same time, it involves a broad range of skills from carpentry, to engineering, to electronics. It can be overwhelming for someone getting started due to the amount there is to learn, but these days there are tons of youtube videos to help learn specific topics. I hope that my new layout will inspire others to get involved in the hobby and keep the tradition of model railroading alive for generations to come.
